
Thursday, 17 December 2015
Tuesday, 15 December 2015
Filming - Sam McLeish
At long last, our filming is complete with one day ahead of schedule!
We were incredibly lucky that our team and actors found time to complete the filming in a awkward time frame. For example, we started to film and a noisy class turned up halfway. So, what we did was film all the parts that didn't needed any sound, which was the beginning of the scene when Alichia's character entered the room and sat down. We realised that this wouldn't be an issue because any extra sound can be added through foleys and it also gives us time to emphasise the backing track.
After this part of the filming, we left the area so that an assembly could take place and filmed over the lunch period. This then allowed us to film the last part of the script from the different angle.
Here is the evidence of us filming.


Monday, 14 December 2015
Organisation of Filming - Sam McLeish
As shown in the location post, we planned to shoot our film in the lighting cage used by the Production Arts students, last Friday (this was posted on 14/12/2015) when all members and actors had free periods (see below). However, after liaising with David Upcraft (my Production Arts teacher), The Hub, which is the performance area that is overlooked from the lighting cage, was being used by a performance for local Junior School children being performed by the Performing Arts class.
Due to this factor, we spoke with the actors, as well as Marion (our teacher for the lesson), and came to the conclusion that it would only be possible to film this week, despite the fact that the deadline for the filming was for Friday.
On the timetable, it shows that we only have an hour for filming whilst we are free. This should not be an issue as the actors are well rehearsed, it will not take long for the set to be ready and it is only a short scene.
Assuming that filming will be completed in this time space, this leaves us in a position where we can edit the footage on Wednesday (P5/6) as a group and then individually after that.
If the shoot isn't complete in this time, or if more footage is needed, we always have the Wednesday as backup so we are now in the comfortable position to meet the editing deadline for this Friday.

Thursday, 10 December 2015
Props, Costume and Make Up - Maria Beardall
We asked the lovely actresses to send in pictures of their clothing.
Alichia was asked by us to wear dark clothes as she is seemingly the antagonist in this scene:


Emily was asked to wear lighter clothes as she is the victim in this scene:


Alichia was asked by us to wear dark clothes as she is seemingly the antagonist in this scene:


Emily was asked to wear lighter clothes as she is the victim in this scene:


As Emily is held captive she will also be wearing dark eye shadow on her face to create a look of grubbiness and that will tell us that her location is not pleasant at all.
Lighting - Jess Smith
We have decided to have very minimal lighting throughout the scene. We won't have the regular light switched on at all because we want to create tension, therefore we believe that can be done by have one flash light on the character who is talking. We also will adapt the lighting by sliding a yellow sheet across the front of the light to add a bit of variation and uniqueness to the scene. We aren't currently 100% sure where we will place the light in relation to the actors, so we will have a feel for where the light looks good and where it doesn't and go from there.
This is an image of the regular light without the yellow sheet:
This is an image of the regular light without the yellow sheet:


Wednesday, 9 December 2015
Props and Costume - Jess Smith
This image below is the plan myself and Maria drew up on what props will be used in the scene and the costumes each character will wear.

We knew we wanted the clothing to be simple, yet effective, hence the contrast of one actress wearing all black while the other actress wearing all white. We did this because we believe it will create a good contrast on the camera for the audience.
The reason we've chosen a black bag for the scene is for when Alichia pulls out sheets of paper to show Emily, therefore she needs a holding place for them. Including a bag at the beginning of the scene also creates anticipation for the audience as to what will be inside the bag, creating suspense.
We decided to have Emily in the white because she is the most innocent out of the two characters. We also thought having a colourful bracelet on her wrist would add new, bright colours on the screen and we feared without any colour the scene could be boring and uninteresting to look at. We also wanted to add makeup on Emily's face to show her un-cleanliness and lack of care for herself. We will do this by using our fingertips to apply dark eye shadow blobs on her face. Emily's messy hair will further support this.
We then decided to make Alichia look more sophisticated by adding a watch to her wrist. The fingerless black gloves will be worn for readers to question what's happening at the current time and also create worry, as they connote burglars and this way she can also have black nail polish on to add to the emo vibe. The black beanie will also be worn on over her hair to further support a sense of danger as burglars also wear them and also suggests she doesn't want to be seen doing this. Furthermore, she will also wear black eyeliner to make her look very dark and this will be done by adding as much black as possible.
This is a screenshot from a newspaper of a murder case. We saw this and thought it'd be perfect to use as the blackmail material that Alichia's character would be producing. (This section was written by Sam McLeish)

Storyboard - Maria Beardall
We have created a storyboard so we can structure what we do from here on with this plan, which includes shot types and duration of the shots. It shows the story and gives us a basic outline of how we want the piece to look in a clear way.
Here is our storyboard:


Here is our storyboard:


This is the process of us making the storyboard:
T
Thursday, 3 December 2015
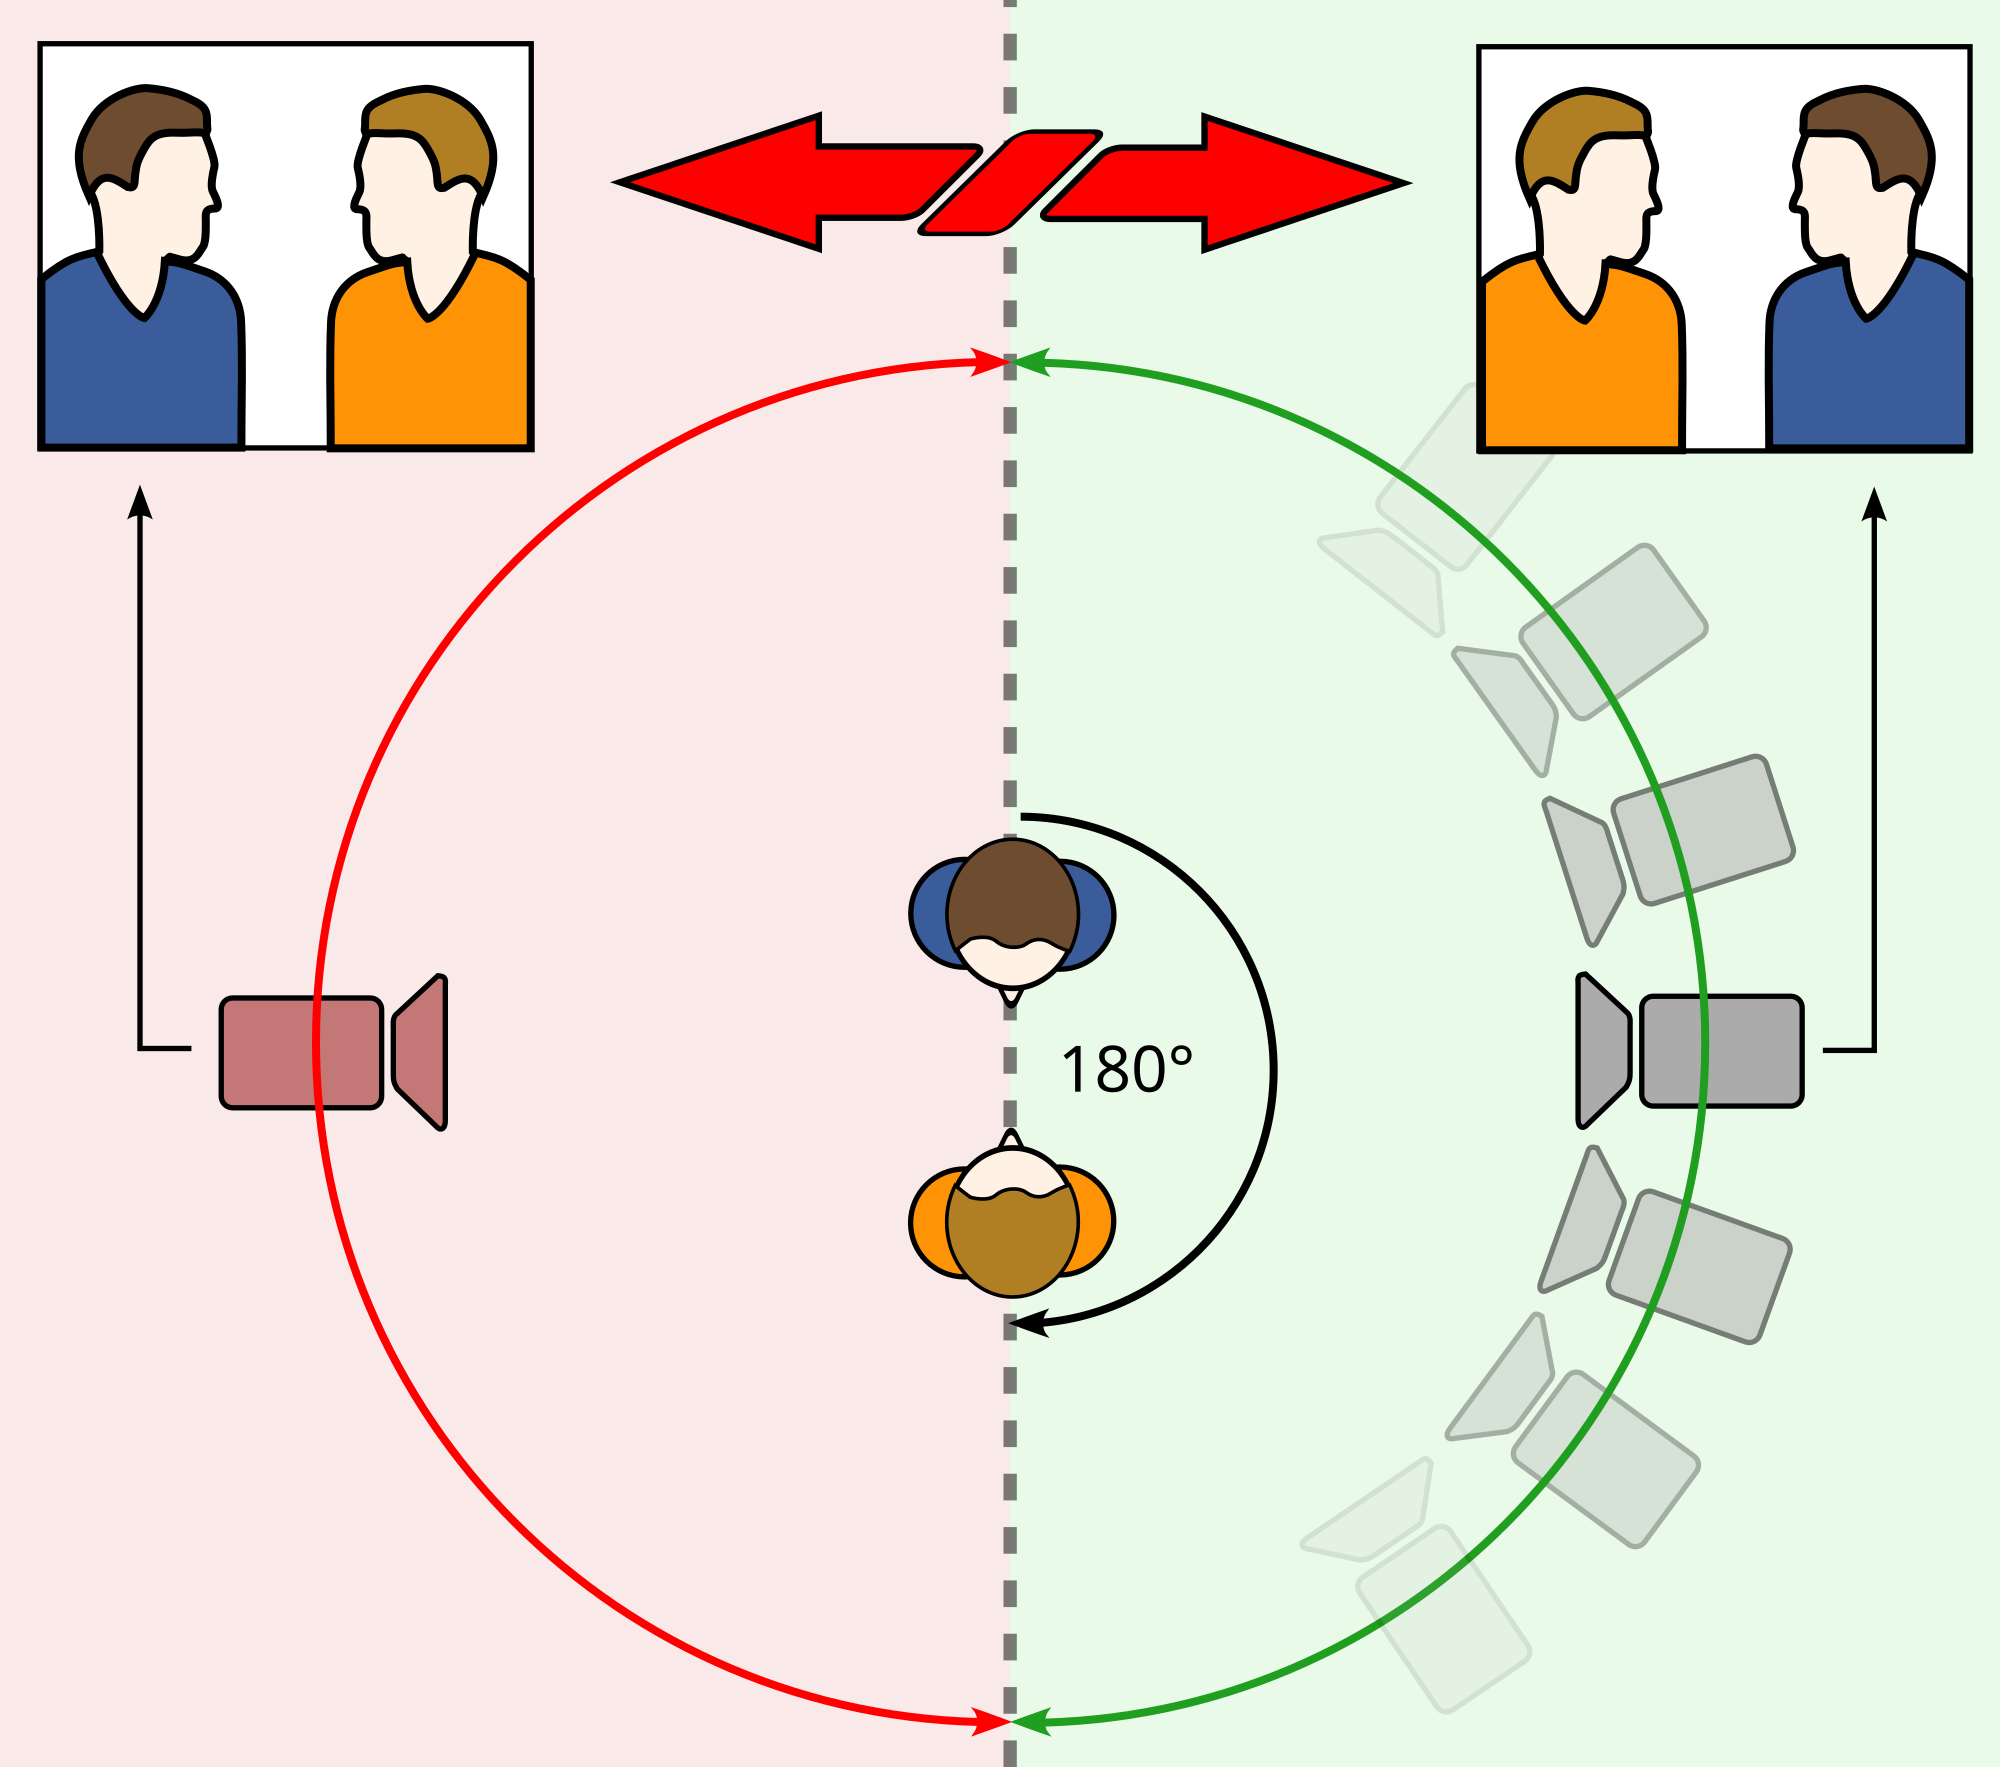
The 180 Degree Rule - Maria Beardall
The 180 Degree rule is a continuity editing technique that creates an imaginary line between characters and deciphers the side that a camera may be allowed on. It creates a logical and easy to follow scene.
A rough definition is,
'It's called the 180 degree rule as you can't move the camera more than 180 degrees, the camera, therefore must remain the same side as the imaginary line. The rule should never be broken as it's for effect and if broken will confuse the audience.'
There is also a useful video on YouTube to help understand the rule:
A rough definition is,
'It's called the 180 degree rule as you can't move the camera more than 180 degrees, the camera, therefore must remain the same side as the imaginary line. The rule should never be broken as it's for effect and if broken will confuse the audience.'
Therefore we can take from this that if the rule is broken the scene will loose continuity and will seem odd and confusing to the viewer, yet if it is kept will look much more effective and due to this happening an 'Eyeline Match' will automatically follow - also another continuity editing technique.
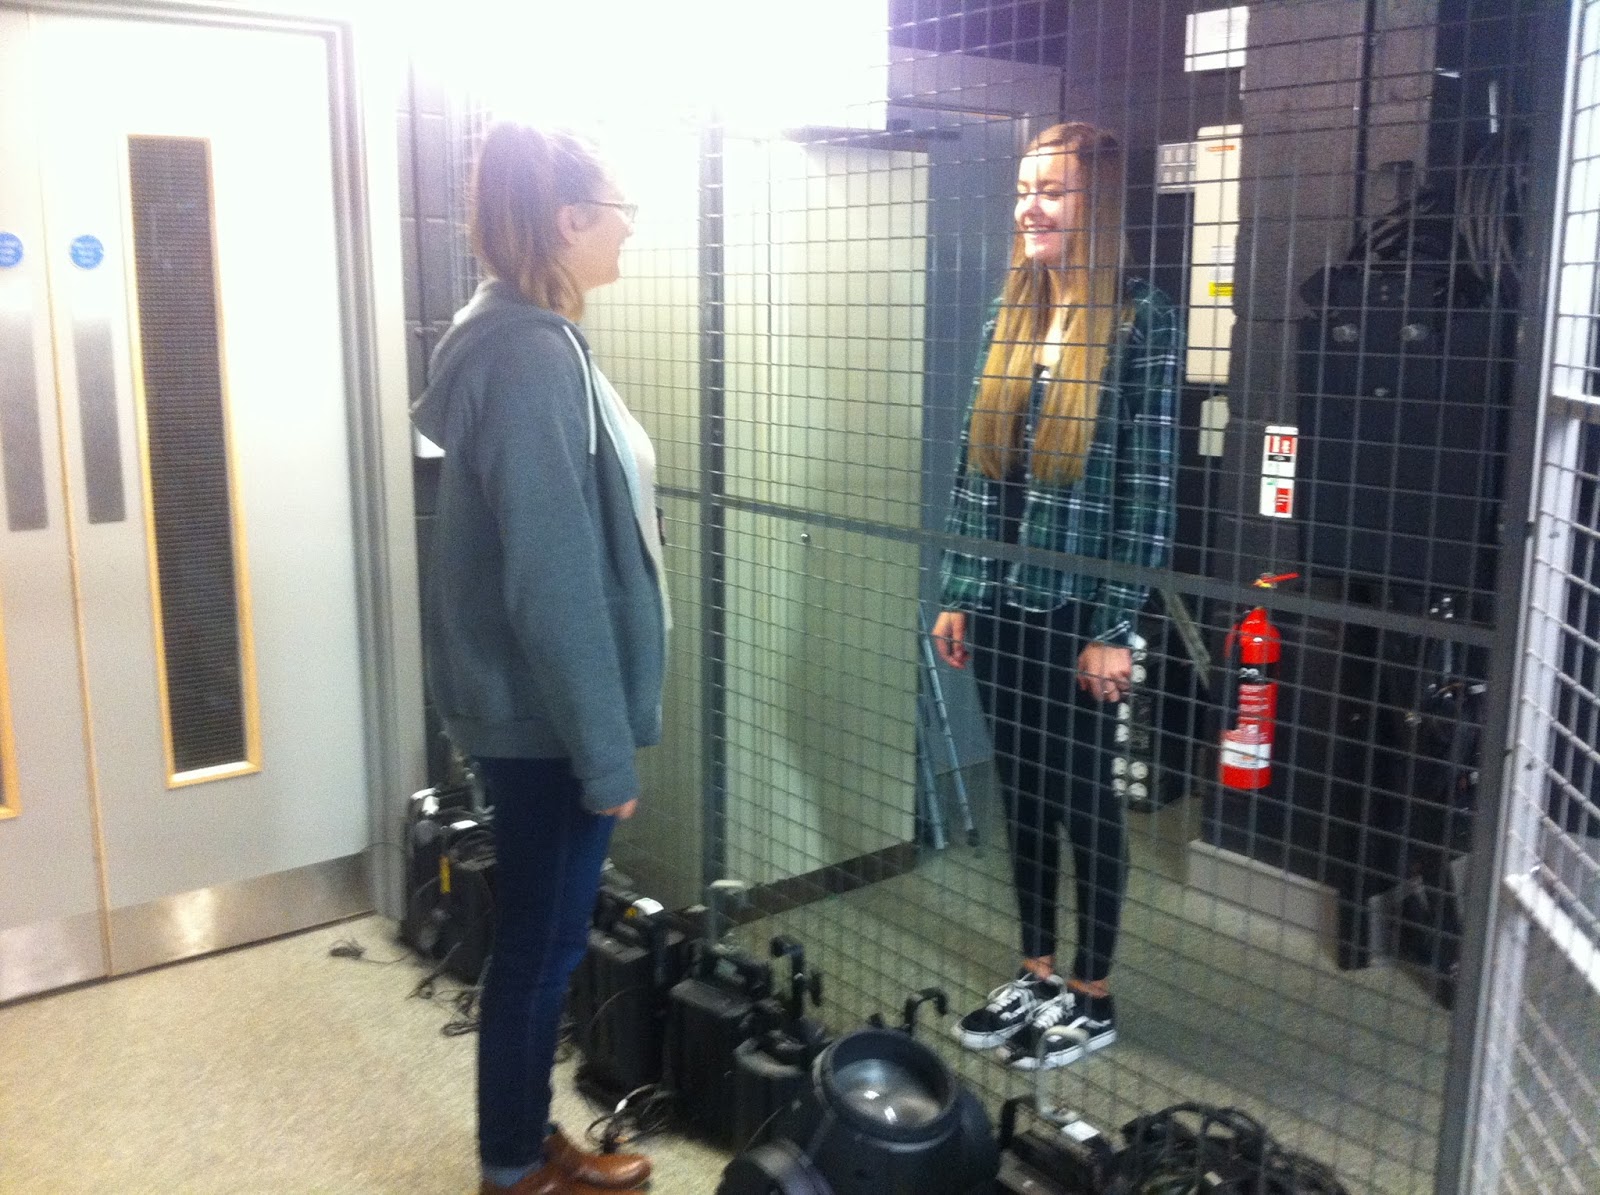
Planning of the Sequence - Location - Sam McLeish
 During this stage in the production process, we decided that the best place for us to film within college would be in the cage that is used to store the Production Arts Department's lanterns. This would contribute well because it adds to the air of mystery created by the script.
As shown in the photos, the two characters would be separated by the cage so it adds to the tension as they'd both be angry with each other.
 As shown in the video below, there is a lot of Health and Safety concerns but they can be easily avoided.
For the filming, each of the characters will be sitting on a chair either side of the cage. Due to this, the chairs would have to be placed safely after moving the equipment out of the way in a calm manner.
Here is the evidence for permission of the use of the lighting cage.

Script and Cast Planning - Sam McLeish
 |
| Alichia Jones |
During the early stage of the production process, we decided that the film should be in the style of thriller in order to get good practice for the official coursework. As well as this, a thriller film gives us as a team more options to make a memorable piece.
In terms of cast, I sought the help of Emily Sharpe and Alichia Jones, two friends of mine who are taking Performing Arts at A-Level. I personally thought that they would be perfect for the role as they are both hard-working people and brilliant actors. As this was only a simple and short script, they were happy to help as it would not interfere with their own work. Knowing this, we all set up a Facebook group where we shared the script and also found out when we are all free to film. As a result, we found out that we are all free on a P4 every Friday so that would be an ideal time to film or for anything else that needs to be done.
This script was drafted by myself and approved by Maria and Jess.
 |
| Emily Sharpe |
Person A approaches door and enters the room. She stops for a
second in shock and then sits on the table opposite Person B.

Person A; It takes a lot of nerve for you showing your face
here…

Person B; (shouting) Get out now! I can’t talk to you.

A; Calm down!! Let me explain. (Pulls papers out of a bag)

(Person B reads the papers and gets increasingly angrier)

B; Where did you get these?! (Throws papers across the room)

A; Calm down! (She sneers) You wouldn’t want these to get out
would we? Now let’s discuss payment.

B; You’re a monster! How could you blackmail your own sister?

A; (She just smiles, gets up and leaves).
I personally feel that this script will be acceptable for this film because it is open to interpretation
by both the actors and the audience. This means that the film can go in any direction that it wants
whilst still being a clear thriller.
Here is evidence of the group chat:

Assignment Of Roles - Jess Smith

 SAM:
SAM:


Roles:
-Main Camera Operator
-Location Scout
-Casting Director
We have chosen Sam to carry out these specific roles for many different reasons. He already had an idea as to where we should shoot the scene, therefore we all agreed that he should be the location scout. Sam also has had the most experience with using camera's and felt comfortable filming, therefore we trusted him the most. In addition, the reason for allocating the role of being the casting director to Sam was because, similarly to having location idea's he also had people in mind that we could use for our filming as actors, which was great.
 MARIA:


Roles:
-Second Camera Operator
-Storyboard Artist
-Prop Manager
We've chosen Maria to be the second camera operator because we knew it would be wise to have someone to assist Sam if he needs help with anything or if he's not around one day. Maria was also confident with handling a camera and happy to also be responsible for filming. In addition, Maria was voted the best drawer out of the three of us, therefore we all agreed she would be the most appropriate for the storyboard. Maria was then signed the prop manager because she is aware of what will work with the actors in the scene and fit with the storyline.

JESS:

Roles:
-Sound Recorder
-Director Of Filming
The group assigned me with the role of sound manager because Sam and Maria were already allocated camera operating, therefore it was better for me to manage the sound as they would be focussing of filming and camerawork. I also believe I will also know what sound is working and what isn't effective for the scene, therefore I'm happy for that reasonability. I'm also the director of filming because it will be easier for the camera operators to stop and start filming if they have someone telling them. It will be more effective for this person not to be operating the camera. Because I will have to my eyes on the actors the whole time I will be extremely focussed and aware of when to stop and start filming.
Wednesday, 2 December 2015
Match On Action - Maria Beardall
Match On Action is also another continuity editing technique used.


It is important to include Match On Action to make cuts fluid and continue the action in a seamless way.
To explain this, take an example of a mid shot of a lady walking up to the door and opening it - this would be the first shot. The second, to match the action, would be a close up of her hand on the door. This is an example of Match On Action as one shot cuts to another shot displaying the action from the first in the second.
A 'visual bridge' is created through continuing the action and creating continuity within a scene. Altogether it creates a smooth transition and sense of action for the viewer.
Here is another visual example:
And another:
Match On Action example from YouTube:
It is important to include Match On Action to make cuts fluid and continue the action in a seamless way.
Shot Reverse Shot - Jess Smith
Shot Reverse Shot is a continuity editing technique used when filming and is the display of character one looking at character two. A shot will then follow this of character two looking at character one. Therefore it creates each shot is the reverse of the previous one. this is usually done during a conversation between the two characters. Both shots use either a point of view or over the shoulder shot.
This technique uses the 180* rule, therefore creates eye line match in close up shots. This is done by a three camera set up sequence. This technique was used to be described as "invisible editing" because of the simplicity of it and stayed in the bounds of continuous time. However current filmmakers use it more dramatically, making it more pronounced.
Using this technique creates intensity because each character is shown looking at the other character who is usually off screen therefore it gives the audience a sense of mystery and anticipation.
These images are both visual examples on how Shot Reverse Shot would be shown the an audience:


This technique uses the 180* rule, therefore creates eye line match in close up shots. This is done by a three camera set up sequence. This technique was used to be described as "invisible editing" because of the simplicity of it and stayed in the bounds of continuous time. However current filmmakers use it more dramatically, making it more pronounced.
Using this technique creates intensity because each character is shown looking at the other character who is usually off screen therefore it gives the audience a sense of mystery and anticipation.


This is a diagram of the camera positions from a birds eye view:

Deadlines - Sam McLeish
Week Beginning –
November 30th (lessons 1-2)
Stage One
Form your groups. Groups consist of 3 or 4 students.
Set up your group blog.
Fill in the Sheet given to you by technicians
and return this.
Ensure everyone in the group knows the URL
and PASSWORD
Use a template that shows the archive in a
sidebar.
Use a clear labeling system on posts.
Blog Posts ONE TO FOUR
Post 1) A copy of “The Preliminary Task”
Post 2) The 180 degree rule – explain – (Illustrations, text, video commentary,
embedded video)
Post 3) Shot/Reverse shot – explain
(Illustrations, text, video commentary, embedded video)
Post 4) Match on Action – explain
(Illustrations, text, video commentary, embedded video)
Blog Post FIVE Allocate the tasks below to group
members. Blog these decisions.
- Camera operator - assign the person most skilled at this to this task.
- Sound recorder.
- At least two people should take responsibility for filming.
- Storyboard artist/s (draws storyboard to group’s plans).
- Location Scout/s (selects locations and organises to shoot there)
- Prop Manager (organises props for shooting)
- Casting Director (organises actors where needed)
- Director of filming (calls lead in and out to start and end filming)

It is likely that most tasks will be undertaken quite
collaboratively. However, if someone has
particular skills, then utilise these.
(Lessons 3, 4, 5 and 6)
Stage Three - Planning the sequence.
Match
the brief to a simple storyline – As the main task is a thriller, this is an
opportunity to practice shooting and editing to this genre.
Location
– Where will you film? Is it available? Photograph/film it for the blog.
Costume
– be ambitious and dress characters appropriately
Props
– again be ambitious. Source your props.
Lighting
– Use lighting as much as possible, not just for low key lighting effects. It will transform your work.
 Storyboard
the 1 minute sequence – use the storyboard tiles attached in the booklet.
Storyboard
the 1 minute sequence – use the storyboard tiles attached in the booklet.
Consider :-
- Shot distance,
- Angle and movement,
- Transitions,
- At least, the 3 continuity techniques mentioned.
- 180 rule, S / RS, Match on Action, Eyeline match
In addition, include :-
- Timing in seconds for each shot,
- Exact lines of dialogue,
- Sound effects and or music.
Post Six – Upload your storyboard to your blog
Stage Four – before you film
- Exchange mobile phone numbers
- Identify coinciding non teaching periods on group members timetables.
- Organise a time to do your filming.
- Who is responsible for various aspects of Mise en scene - props, locations, costumes, make up.
- Organise all equipment (camera, lighting, tripod, mics and sound recorders)
- Remind yourselves of WHITE BALANCE, FRAMING OF SUBJECT, MAKING A SANDWICH,
- Conduct a risk assessment for your shooting locations and record this on your blog.
Post Seven
Record all of the above on your blog under a
title of Pre-Production planning (apart from phone numbers).
(Lessons 7 and 8)
Stage Five - The Filming.
 There is an unwritten rule in filming – the
best films tend to have the most waste footage.
Shoot each shot several times, as well as from a variety of positions.
Make absolutely certain that you have sufficient footage to edit successfully.
There is an unwritten rule in filming – the
best films tend to have the most waste footage.
Shoot each shot several times, as well as from a variety of positions.
Make absolutely certain that you have sufficient footage to edit successfully.
Make sure that you allow plenty of recorded
time BEFORE AND AFTER the part of the shot you intend to use. Create a “Sandwich”.
Make sure the ‘rushes’ are on the mac network
and saved in the appropriate file. Check
with Matt or Sophie before saving your work!!
You have to Log and save footage immediately after filming – camera
memories will be wiped on return to the technician.
Record EVIDENCE of your filming process whilst
filming. Use your phones for this and
then record it on the blog. This is to
prove that you made your film and that all members of the group were present! If you can, record a group conversation
explaining what you have learnt from the process – what went well, not quite so
well and why?
Document yourselves setting up your lighting
– capture images showing the differences between lit and unlit scenes.
Document yourselves setting up the recording
of your sound using the lapel mics and voice recorders.
Post Eight – blog the evidence of your filming
(lots of images or embed your own video footage) having taken place and
evaluate this – what went well and not so well – why?
(Lessons 9, 10, 11 and
12)
Stage Six – You will receive a refresher on how
to use the editing suite. Edit your
sequence.

Post Nine – again, blog evidence of your editing
process. (Have imagery or embedded
video). This will show that you have all
been involved. Document key editing
decisions and effects that you have used.
Lessons 13, 14, 15 and
16 (first week back after Christmas)
Stage Seven
You will also have to sound edit – Create
your diegetic sound with dialogue (recorded separately), sound / Foley effects,
ambient sound and any Non diegetic music or voice overs.
Post Ten – Blog discussions about your sound
editing – Using Garage band, using sound recorders, how you chose music, how
you recorded dialogue, making your own foley effects
MEDIA STUDIES
PRELIMINARY EXERCISE DEADLINES
DEADLINE
ONE:
Pre-Production
planning
Blog
posts 1 – 7
By
End of lesson 6 (Tuesday 8th December)
|
DEADLINE
TWO:
Complete
all Filming
Blog
Post 8
By End of lesson 8
(Friday 11th Dec)
|
DEADLINE
THREE:
Complete
all Image editing
Blog Post
9
By End of lesson 12 (Friday 18th
Dec)
|
DEADLINE
FOUR
Complete
sound editing
Blog
Post 10
FINISHED
PRODUCT MUST BE SAVED TO THE COMPLETED WORK FOLDER – AS Prelim 2015-15/AS
BLOCK ?/ Your full names.
GROUP BLOG MUST BE
COMPLETE TO FINAL STAGES
FINAL
DEADLINE IS January 8th.
|
Subscribe to:
Comments (Atom)